0

Record your composition

By Getting started

Record your composition

There are many ways to record your audio visual composition. Three ways are described below:

  • recording the visuals and audio with SplitCam
  • recording the visuals and audio with Syphon recorder
  • recording the visuals with Syphon recorder and audio with Ableton Live

Recording visuals and audio with OBS

To record the visuals and audio with OBS you’ll need to install the OBS application and BlackHole (both free).

In Ableton Live set your Audio Output Device to BlackHole (2 In, 2 Out).

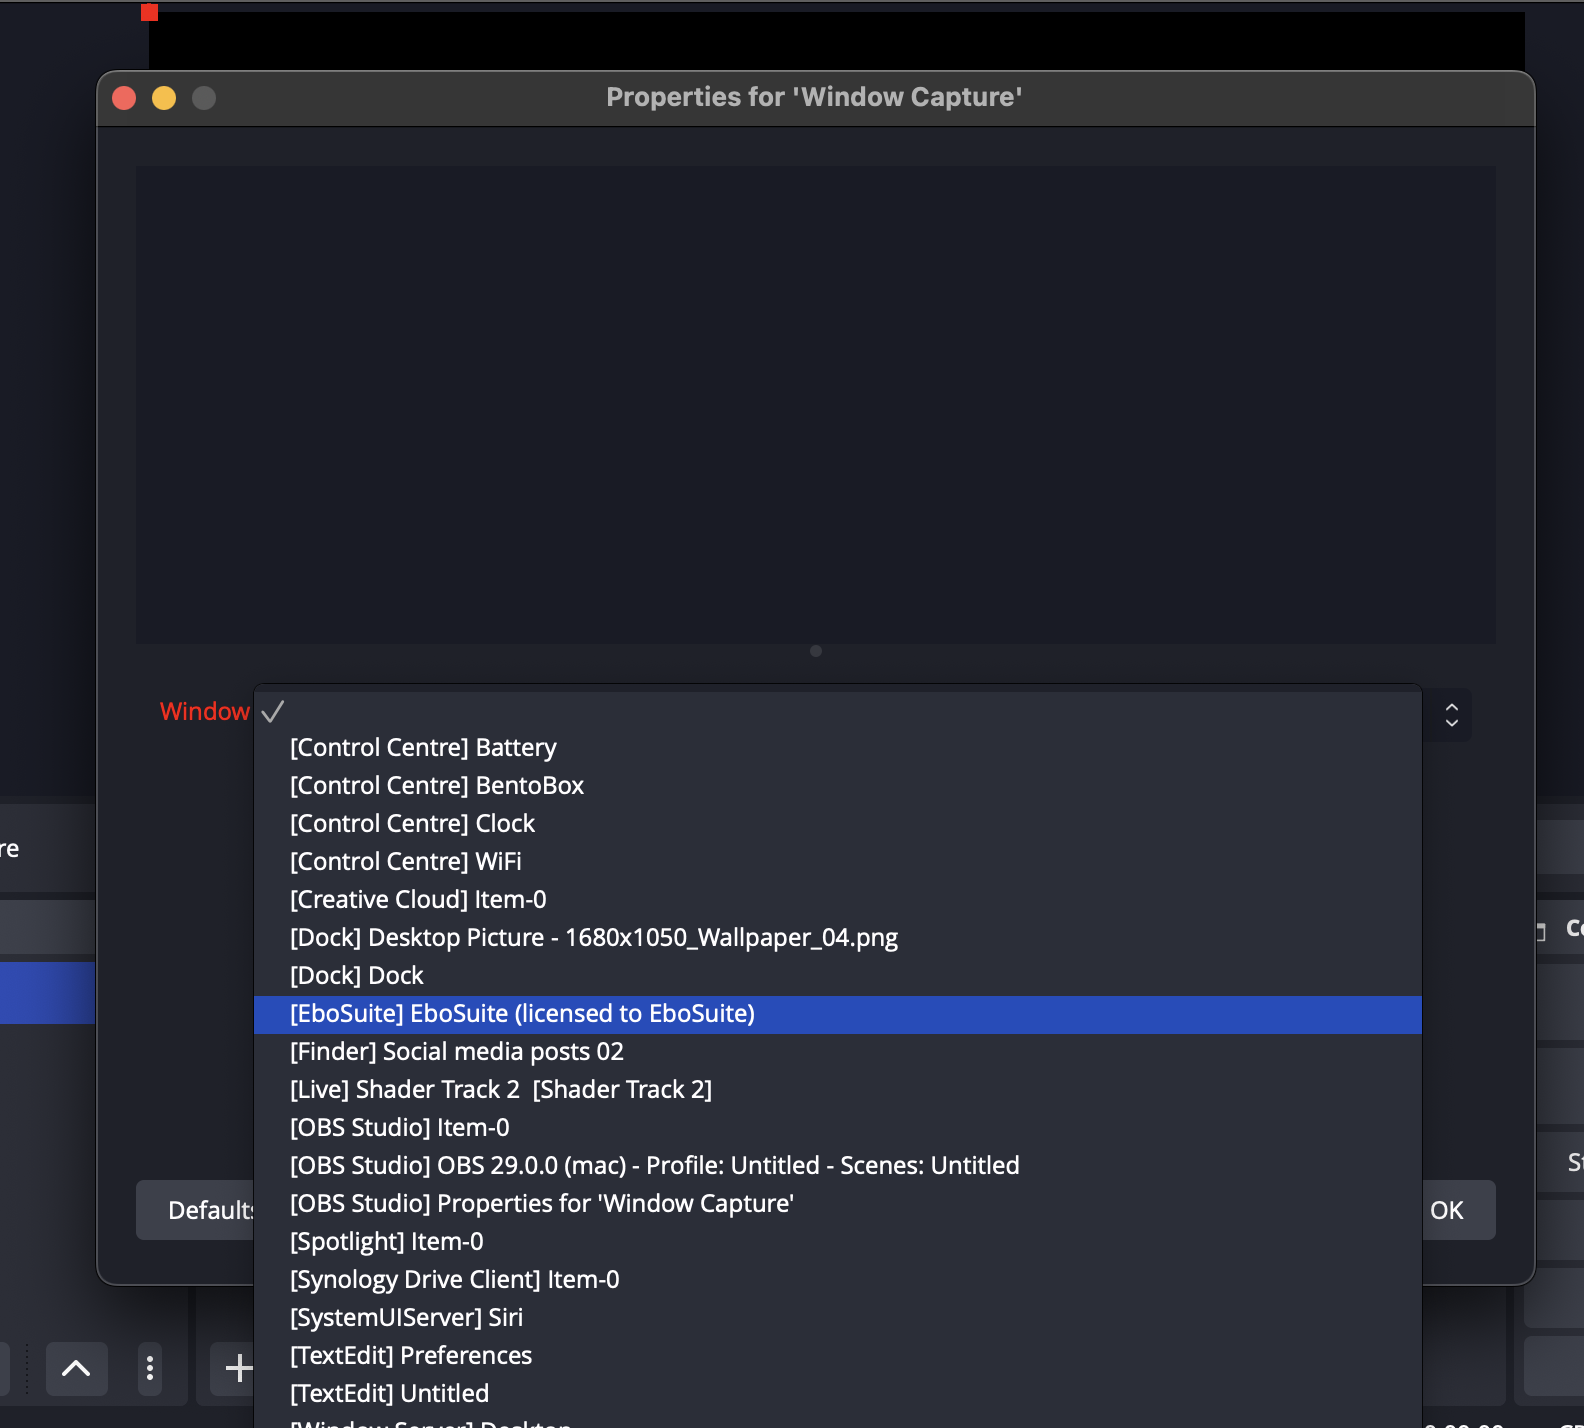
In OBS press the ‘+’ to add a ‘Windows Capture layer’ to your ‘Scene’. Give the window layer a name and press ok. Select the EboSuite output window from the dropdown list, hit ok to confirm your choice. Press ‘+’ again to add an ‘Audio Output Capture layer’ to your ‘Scene’. Give the layer a name and press ok. Select the Blackhole 2ch from the dropdown list, hit ok to confirm. Press the ‘Start Recording’ button to make a recording. Set the folder where the video recordings will be saved in the preferences (‘Output’).

Recording the visuals and audio with Syphon recorder

To record the visuals and audio with Syphon recorder, you’ll need to install the Syphon recorder application and BlackHole (both free).

To record and monitor the sound at the same time, you’ll need to create an Multi-Output Device. To do so, follow these steps:
  • Open ‘Audio MIDI Setup’ from the Applications/Utilities folder
  • Press ‘+’ and select ‘Multi-Ouput Device’
  • Give this Aggregate Device a name (‘EboSuite OUT’, for example)
  • In the Audio Device list, enable your preferred audio output source (MacBook Pro Speakers in this case) and BlackHole 2ch
  • Turn on Drift Correction for the devices that are not the clock source (BlackHole 2ch)

In Ableton Live set the Audio Output Device to the Multi-Ouput Device. Add an eVideoSend plug-in to the Master Track (or another track with an EboSuite video source) to send the visual output of that track to Syphon Recorder.

Preferences for Ebosuite video plugin

In Syphon Recorder select the visual output from EboSuite (called ‘Master – EboSuite’ in this case) from the drop down menu in the main window. Turn on ‘Record Audio’ in the preferences and select BlackHole 2ch as the source.

Recording the visuals with Syphon recorder and audio with Ableton Live

To record the visuals with Syphon recorder and audio with Ableton Live, you’ll need to install the Syphon recorder application (free).

You can record the audio in Ableton Live in two ways:

  • as a live performance – record the audio in Ableton Live on an audio track live (learn more about this in the Ableton Live manual)
  • render – render the audio of your composition using Ableton Live’s export audio feature (learn more about this in the Ableton Live manual)

To record the visual output of EboSuite, add an eVideoSend plug-in to the Master Track (or another track with an EboSuite video source) to send the visual output of that track to Syphon Recorder.

In Syphon Recorder select the visual output from EboSuite (called ‘Master – EboSuite’ in this case) from the drop down menu in the main window. Note that if you have multiple eVideoSend plug-ins in your Live Set, multiple track names will appear in the drop down menu.

After recording/rendering the audio and visuals, follow the next steps:

  • drag the movie file created with Syphon Recorder to an audio track in Ableton Live (this will open Ableton Live’s standard video output window).
  • drag the recorded/rendered audio file to an audio track below the movie file in Ableton Live
  • sync the audio and movie file by moving the audio file
  • export the audio and video tracks to a new movie file using Ableton Live’s export audio/video feature. Learn more about exporting video from Ableton Live using the standard export function in the Ableton Live manual.

Note: you can use any screen capture application (QuickTime Player for example) to record the visual output window of EboSuite. Each application has its pros and cons. A drawback of QuickTime Player, for example, is that it will record in retina if the output window is on a retina screen. This makes the dimensions of the recording twice bigger than the output window. There is no way to turn that off.

Tutorial (version 1.x)

Quick-tip (version 1.x)

eLiveSetTool

By Getting started

The eLiveSetTool is a helper application for EboSuite. Use it to:

  • make Ableton Live sets work again, that have been saved with the ‘Collect All and Save’ option, with the ‘Files From User Library’ option enabled.
  • convert Ableton Live sets made with EboSuite 1.x to EboSuite 2.0

Fix live sets, saved with collect all and save

We advice you to exclude files from the User Library when you use the ‘Collect All and Save’ functionality. If you need to include the files from the User Library for some reason, you’ll need the eLiveSetTool application to make the collected project work with EboSuite.

The reason for this is that Ableton Live will create copies of the EboSuite plug-ins in the project folder, when ‘Files from User Library’ is enabled. Live will load these copies instead of the original plug-ins when the collected project is opened. All EboSuite files need to stay together in the EboSuite folder in Ableton’s User Library, so all EboSuite plug-ins will show an error message.

Use the eLiveSetTool application in ‘undo collect all and save’ mode to fix this issue. Simply drag the ‘.als’ file into the drop zone. It will make a new file in the same location ending with’_decollected.als’ (be aware that it will directly overwrite existing files with that name). It is also possible to perform this action on multiple files at once.

Upgrade Live set from EboSuite v1.x to v2.0

Live sets created with EboSuite 1.x plug-ins are not compatible with EboSuite 2.0 (and vice versa). Select the ‘upgrade Live set from EboSuite 1.x to v2.0’ mode to convert the Live set to EboSuite 2.0. The eLiveSetTool will create a file next to the original .als file and will add ‘_upgraded.als’ to its name.

Note 1: An upgraded 2.0 Live set can be opened with EboSuite 1.x and will not trigger a warning or error message, but it will cause unexpected behaviour of Live and EboSuite.

Note 2: EboSuite 2.0 doesn’t support Live 9, so Live 9 sets can not be upgraded with the eLiveSetTool. To upgrade a Live 9 set, first save it in Live 10 and then upgrade it with the eLiveSetTool.

Video codecs

By Getting started

Video codecs

Important: EboSuite can handle many video codecs, like Hap, H264, ProRes, MPEG-4, DV and Photo-JPEG. Choosing the right codec and compression settings is crucial for optimal performance and reliability of EboSuite. We strongly recommend to use the Hap or ProRes video codec (and NOT to use H264). The Hap codec is optimised for live video applications and the ProRes codec also provides very good video playback performance, especially on computers with the M1/M2 chip. We also strongly recommend to use an SSD drive.


Coverting video


Use EboSuite’s eConvert plug-in to convert your video files to the Hap or ProRes codec within Ableton Live and load them directly in the eSampler or on an audio track. You can read more about the eConvert plug-in here. You can convert multiple videos at once with the AVF Batch Converter.


Hap is not supported by Mac OS by default. You don’t have to install the Hap codec to work with EboSuite, but we recommend that you install the HAP codec anyway to be able to playback Hap encoded videos with other software. You can read more about the Hap codec here.

Hap

Hap is a video codec that is optimised for live video mixing, triggering and manipulation. This codec offers you the best performance and reliability in EboSuite. There are four variations of the Hap codec: Hap, Hap Q, Hap Alpha and Hap Q Alpha. Hap Alpha and Hap Q Alpha support an alpha channel (transparency), Hap and Hap Q do not. The file size of a Hap compressed video is typically large. Since video decompression is handled by the GPU, a fast GPU (graphics card) is needed for good performance. Since data streams are large, a fast harddisk (SSD drive recommended) as well.

ProRess

Apple ProRes is used by many professional video editors and motion graphic designers, but is not optimised for live video mixing, triggering and manipulation. There are five variations of the ProRes codec: ProRes 422, ProRes 422 LT, ProRes 422 HQ, ProRes 422 Proxy and ProRes 4444. ProRes 4444 supports an alpha channel (transparency), the ProRes 422 variations do not. When you don’t need an alpha channel we advice you to use ProRes 422 LT. The file size of a ProRes compressed video is typically medium to large. A fast CPU and harddisk (SSD drive recommended) are needed for good performance when playing/mixing multiple videos at the same time.

H264

H264 is a very popular codec, but is not optimised for live video mixing, triggering and manipulation. H264 does not support an alpha channel (transparency). The file size of a H264 compressed video is typically small. The compression settings (quality/data rate/image size) have a big impact on the performance of H264 videos in EboSuite. We recommend you to try out different compression settings and image sizes to see what works best in your situation and on your system. A fast CPU is needed for good performance when playing/mixing multiple videos at the same time. Because the data streams are small H264 works pretty good on HDD drives, but a SSD drive is recommended.

MP4

MP4 is a container, not a codec. A MP4 file can contain different video codecs, but H264 is very common. Use OSX Finder’s ‘Get Info’ option (CMD-i) to determine a video file’s codec.

Welcome

By Getting started

Welcome to EboSuite

Make Music With Video

EboSuite is a growing set of plug-ins (currently 53) that turns Ableton Live into an audio-visual production suite. With EboSuite you can create, sample, play, mix and manipulate visuals in the same way as you are used to with audio.

The plug-ins are designed to fit seamlessly in the creative workflow of music producers and performers. This provides an unrivalled way of integrating music and visuals into live shows and music productions. EboSuite enables musicians/artists to produce their own video clips, audiovisual performances and innovate in the field of visual music.

About this manual

EboSuite is under constant evelopment and therefore the manual is updated on a regular basis. If you have any more questions or comments please visit the forum. There you’ll find more information about EboSuite and we will reply as soon as possible when you post a question or comment there. Tutorial videos are available about the use of EboSuite and some specific features. If you have questions about the concepts and use of Ableton Live please refer to the Ableton Live manual.

Application and output window

By Getting started

The EboSuite application and the Output Window

The EboSuite application will automatically be launched when you add a visual source plug-in to your Ableton Live set (eSession, eArrangement, eSampler, eSimpler, eISF, eVideoIn, eText). When the EboSuite application is launched the video output window will appear.

When the application is active in the foreground (click inside the output window to bring the application to the foreground) the application’s menu bar will appear at the top of the desktop.

The EboSuite application can only be controlled from the menu bar and from the EboSuite plug-ins in Ableton Live. The menu bar contains the following items:

  • EboSuite
    • About EboSuite – information about EboSuite
    • Licensed to: – name and email address of licensee
    • Services – no services apply
    • Hide EboSuite
    • Hide Others
    • Show All
    • Quit EboSuite
  • File
    • Close – this will close the output window and quit the EboSuite application
  • View
    • Statusbar – this will add the status bar to the output window showing the current window size and the amount of free VRam
    • Always On Top – this will force the output window to always stay on top of other windows, even when another application is active in the foreground
    • Titlebar – this will add the title bar to the output window
    • Renderer – select which processor is used to process all visual playback, mixing and manipulations
    • Enter Full Screen – this will make the output window fill the whole screen
  • Window
    • Minimise – this will minimise the output window and move it to the dock
    • Output sizes – a selection of default output window sizes
    • Bring All to Front

The output window can also be controlled using the eOutput plug-in. You can also set the output window to full screen mode by right-clicking (or ctrl-click) the EboSuite icon in the Dock in the Finder.

Basic Concepts

By Getting started

Basic concepts

EboSuite application

The EboSuite application handles all visual playback, mixing and manipulation. The application runs in the background in a separate instance from Ableton Live, so all video processing is done outside Ableton Live to maximise performance and reliability. The EboSuite application is controlled by the EboSuite plug-ins in Ableton Live.

The plug-ins

Currently EboSuite consists of 56 plug-ins, organised in five categories:

Sources:

  • eSession – adds video playback to Session View
  • eArrangement – use videos on audio tracks in Arrangement View
  • eSampler – trigger, pitch, record, stretch and scratch video
  • eSimpler – turn Ableton Live’s Simpler into a video sampler
  • eISF – use ISF shaders to generate visuals
  • eVideoIn – use the video stream of a webcam, iPhone or iPad in EboSuite
  • eText – use the name of a clip in the video mix or send it over Syphon to other video applications

Mixing:

  • eTrackTransform – position, scale, rotate individual tracks
  • eBlend – use blending modes to mix video tracks
  • eCrossfade – use visual crossfade effects to mix videos
  • eFade – control the opacity of a track
  • eFeedback – create a video feedback loop on the master track with different feedback modes
  • eGroup – add visual effects on grouped tracks
  • eMask – cut out part of a track
  • eReturnTrack – add visual effects on return tracks
  • eVideoSend – send the video output of a track to another track or other video applications
  • eVideoReceive – receive the visual output of another track or the visual output of other video applications

FX:

  • eFX-ISF  – use ISF shaders to generate and/or manipulate visuals
  • eFX  – 30 modular, stackable visual effect plug-ins for realtime image manipulation and processing

Tools:

  • eOutput – control the output window from within Live
  • eConvert – convert video to Hap codec
  • eSamplerSliceSettings – control the audio analyser of the eSampler to automatically slice samples

Extra:

  • ePoly – create polyphonic and polyscopic compositions
  • eComper – consolidate a MIDI clip to a video file
  • eLoopStutter – bring dynamic ‘beat repeat’-like effects to eClips

Video tracks

Currently up to 64 video tracks can be used simultaneously with EboSuite. 512 video files can be used in a single Live set and on a single track. The specifications of your hardware (CPU, GPU) might limit the amount of tracks that you can use simultaneously.

Mixing videos

To mix videos you first have to create at least two video tracks by adding at least two visual source plug-ins to your Live set (eSession, eArrangement, eSampler, eSimpler, eVideoIn or eText). By default the opacity of the video tracks is linked to the volume sliders in Live’s audio mixer.

The order of the tracks determines which track is on top and therefore will be visible when its volume/opacity is set to maximum. The right most track (Session View) or bottom most track (Arrangement View) will be on top. Changing the position order of the tracks in Live’s Arrangement or Session View will also change the order in the video mix.

Use the eTrackTransform, eBlend, eMask, eFade and eCrop plug-ins to arrange and mix video tracks.

Assign the tracks to AB crossfade sources and use the eCrossfade plug-in to mix video Live’s crossfader.

Using warped clips

When you use Live 10 you need to save the Warp markers when you enable or change the Warp markers. Otherwise eSession. eArrangement, the eSampler and the eSimpler will not be able to use the Warp markers, which leads to unexpected results, like freezing video, out-of-sync video and black output. Click the ‘save’ button in the Sample section of the audio clip playback properties. Each time you make changes to the Warp markers you need to save them to see the effect of your changes.

Note: When you use Live 11 you will not have to save Warp markers.

The reason for this limitation is that Ableton does not give acces to the Warp markers in Live 10. We can only use one set of Warp markers that is stored in the .asd file after pressing save. When you change the Warp markers and press save, the video playback is automatically updated (this takes more or less one second).

A video clip can only have one set of Warp markers. So if you load multiple instances of a video clip in your Live set, editing the Warp markers from one video clip (and thus saving them) will change the Warp markers for all instances (since you need to save them to use them).

Note: When you use Live 11 you will not have to deal with these issues.

Video codecs and image files

EboSuite is compatible with many video codecs, like Hap, H264, ProRes, MPEG-4, DV and Photo-JPEG. We recommend you to try out different codecs, compression settings and image sizes to find out what works best in your situation and with your hardware configuration.

Important note: Choosing the right codec and compression settings is crucial for optimal performance and reliability of EboSuite. Only the Hap codec is optimised for live video applications, so we recommend you to use Hap encoded videos. You’ll need an SSD  drive to playback Hap properly.  Read more about video codecs in the Video codecs section of this manual.

EboSuite’s eSampler and eSimpler handle image files as well,  like .jpg, .png etc. 

Unfortunately the eSession and eArrangement plug-in don’t handle image files anymore, because Ableton Live doesn’t accept image files on audio tracks anymore (since Live 10.10+).

Error and warning messages

EboSuite will warn you when an unsupported or unexpected situation is detected by showing an error or warning message. You can open and close the error and warning message section of the plug-in interface with the small arrow in the right-bottom of the interface. When there is an error or warning message the arrow wil turn yellow (warning) or red (error) and the error/warning section will unfold to show the message. When the unsupported or unexpected situation is resolved the error/warning message will disappear automatically. Refer to the ‘Error and warning messages’ section of this manual to see a list of the error and warning messages.

Dials/sliders

General information about dials and sliders:

  • The value is visible when you move the mouse pointer over the dial/slider or the label.
  • You can change the value with the mouse, but also by entering the value with keys and pressing enter (for some parameters which use a custom or changing value range this can react a bit unexpected).
  • You can have fine control with the mouse when you hold the shift button.
  • If a dial has an triangle at the top you can also click on the triangle to apply that ‘center’ value.

Info buttons

Use the info buttons (?) in the interface of the plug-ins to learn about specific elements and concepts. The button will open a pop-up window with information and a button that links to the online manual with more detailed information and tutorial/Quick-tip videos.

Info view

Use Ableton Live’s Info View to learn more about EboSuite’s interface elements and functions. Most interface elements will show an Info View description when the mouse pointer hoovers over the element. The Info View section needs to be revealed to show this. To reveal it, click on the triangle in the lower left corner of Live’s interface. You can find more information about Info View in the Ableton Live manual.

Info pop-ups

Many interface elements show an Info pop-up when you hoover over them and wait for two seconds.

Tutorial (version 1.x)

Installation

By Getting started

Installing EboSuite

Installation requirements

  • Mac OS 10.14+
  • Ableton Live 10+ (64 bit only)

Installing

After ordering a full or trial license of EboSuite on the EboSuite website you will receive an email with a download link for the EboSuite installer and a license key. The installer is an Ableton Live set called ‘Open this Live set to install EboSuite.als’. Double-click this file to install EboSuite.

EboSuite will be installed in the User Library of Ableton Live. For this, the installer reads the preference file of Ableton Live, so make sure a valid and available User  Library is selected in the preferences.

When you open the Live set you will notice that Ableton Live will be closed immediately by the installer. This is the beginning of the installation process, hereafter the installer will take you through a few simple steps.

Installed files

The EboSuite installer creates a folder named EboSuite in the User Library. In this folder the installer installs the EboSuite plug-ins and the main EboSuite application. The EboSuite application is a hidden file, so you will not be able to see it in this folder. Please do not move this folder or the files in this folder to another location.

To move EboSuite to another User Library, select this User Library in Ableton Live and run the installer again (open the .als file). To install EboSuite in the User Library of another version of Ableton Live, just open the ‘Open this Live set to install EboSuite.alsâ’ file with that version of Ableton Live.

The installer will create a folder called EboSuite in the Applications folder and put the eLiveSetTool there. Use this application to fix a Live Set that is wrongly saved with the Collect All and Save feature of Ableton Live. And use the eLiveSetTool to convert your Live Sets created with EboSuite version 1.x to a Live Set with EboSuite 2.0.

The installer will also create an EboSuite folder containing an ISF folder. In this folder the ISF shaders are collected used by the eISF and eFX-ISF plug-ins.

This folder can be in two locations, depending on the configuration of your computer.

It can be at: Users/Shared

Or it can be at: Users/[your name]/Documents

Registering EboSuite

After the installation is completed, copy the license code from the email to the clipboard (select the text and press CMD-c) and open Ableton Live. You will find the EboSuite plug-ins in the User Library within Ableton Live.

Drag the eSession plug-in on an audio track. This will launch the EboSuite application in the background and open the video output window. When the EboSuite application is launched for the first time, it will look for the license key in the clipboard and it will register automatically. When registration is completed a pop-up window will appear to confirm this and the name of the license owner will be shown in the top bar of the video output window. When the license key is not available in the clipboard, registration will fail and a pop-up window will warn about this. In this case the EboSuite application will not launch and the video output window will not appear. To fix this, delete all EboSuite plug-ins from your Live set, copy the license key from the email and return to Ableton Live and add an eSession plug-in again.

Registering EboSuite while in demo mode

When EboSuite is running in demo mode it will not ask for a license key on start up anymore. To register while in demo mode, copy the license key from the email and select ‘Enter  License Code’ from the EboSuite menu.

Deactivating a license and moving it to another computer

To deactivate a license and move it to another computer, go to ‘EboSuite’ in the EboSuite main menu and select ‘licensed to [your email address]’. This will open a dialog in which you can deactivate the license, so you can activate another computer.

Settings in Ableton Live

We tried to make the installation and licensing proces as easy as possible. Once EboSuite is installed and registered you can start video sampling, mixing and editing right away. Nevertheless, there are a few settings in Ableton Live that can influence EboSuite’s performance. Therefore, please check the following settings in Ableton Live:

  • make sure the User Library selected in the Ableton Live preferences is available. The EboSuite installer will automatically read the preference file of Ableton Live and install EboSuite in the User Library selected there. If this User Library is unavailable (e.g. when it is located on an external drive that is disconnected), you will not be able to launch EboSuite and the plug-ins will show an error message.
  • Select the appropriate audio buffer size (Preferences/Audio/Latency/Buffer Size). A smaller buffer size will improve the audio-visual sync and performance of EboSuite, but will have a heavier load on the CPU. We advice you to try different settings and look for a setting that works best with your set-up. A buffer size of 128 or 256 samples will work fine in most cases.