
Installing EboSuite
Installation requirements
- Mac OS 10.14+
- Ableton Live 10+ (64 bit only)
Installing
After ordering a full or trial license of EboSuite on the EboSuite website you will receive an email with a download link for the EboSuite installer and a license key. The installer is an Ableton Live set called ‘Open this Live set to install EboSuite.als’. Double-click this file to install EboSuite.

EboSuite will be installed in the User Library of Ableton Live. For this, the installer reads the preference file of Ableton Live, so make sure a valid and available User Library is selected in the preferences.
When you open the Live set you will notice that Ableton Live will be closed immediately by the installer. This is the beginning of the installation process, hereafter the installer will take you through a few simple steps.

Installed files
The EboSuite installer creates a folder named EboSuite in the User Library. In this folder the installer installs the EboSuite plug-ins and the main EboSuite application. The EboSuite application is a hidden file, so you will not be able to see it in this folder. Please do not move this folder or the files in this folder to another location.
To move EboSuite to another User Library, select this User Library in Ableton Live and run the installer again (open the .als file). To install EboSuite in the User Library of another version of Ableton Live, just open the ‘Open this Live set to install EboSuite.alsâ’ file with that version of Ableton Live.

The installer will create a folder called EboSuite in the Applications folder and put the eLiveSetTool there. Use this application to fix a Live Set that is wrongly saved with the Collect All and Save feature of Ableton Live. And use the eLiveSetTool to convert your Live Sets created with EboSuite version 1.x to a Live Set with EboSuite 2.0.

The installer will also create an EboSuite folder containing an ISF folder. In this folder the ISF shaders are collected used by the eISF and eFX-ISF plug-ins.
This folder can be in two locations, depending on the configuration of your computer.
It can be at: Users/Shared


Or it can be at: Users/[your name]/Documents


Registering EboSuite
After the installation is completed, copy the license code from the email to the clipboard (select the text and press CMD-c) and open Ableton Live. You will find the EboSuite plug-ins in the User Library within Ableton Live.

Drag the eSession plug-in on an audio track. This will launch the EboSuite application in the background and open the video output window. When the EboSuite application is launched for the first time, it will look for the license key in the clipboard and it will register automatically. When registration is completed a pop-up window will appear to confirm this and the name of the license owner will be shown in the top bar of the video output window. When the license key is not available in the clipboard, registration will fail and a pop-up window will warn about this. In this case the EboSuite application will not launch and the video output window will not appear. To fix this, delete all EboSuite plug-ins from your Live set, copy the license key from the email and return to Ableton Live and add an eSession plug-in again.

Registering EboSuite while in demo mode
When EboSuite is running in demo mode it will not ask for a license key on start up anymore. To register while in demo mode, copy the license key from the email and select ‘Enter License Code’ from the EboSuite menu.

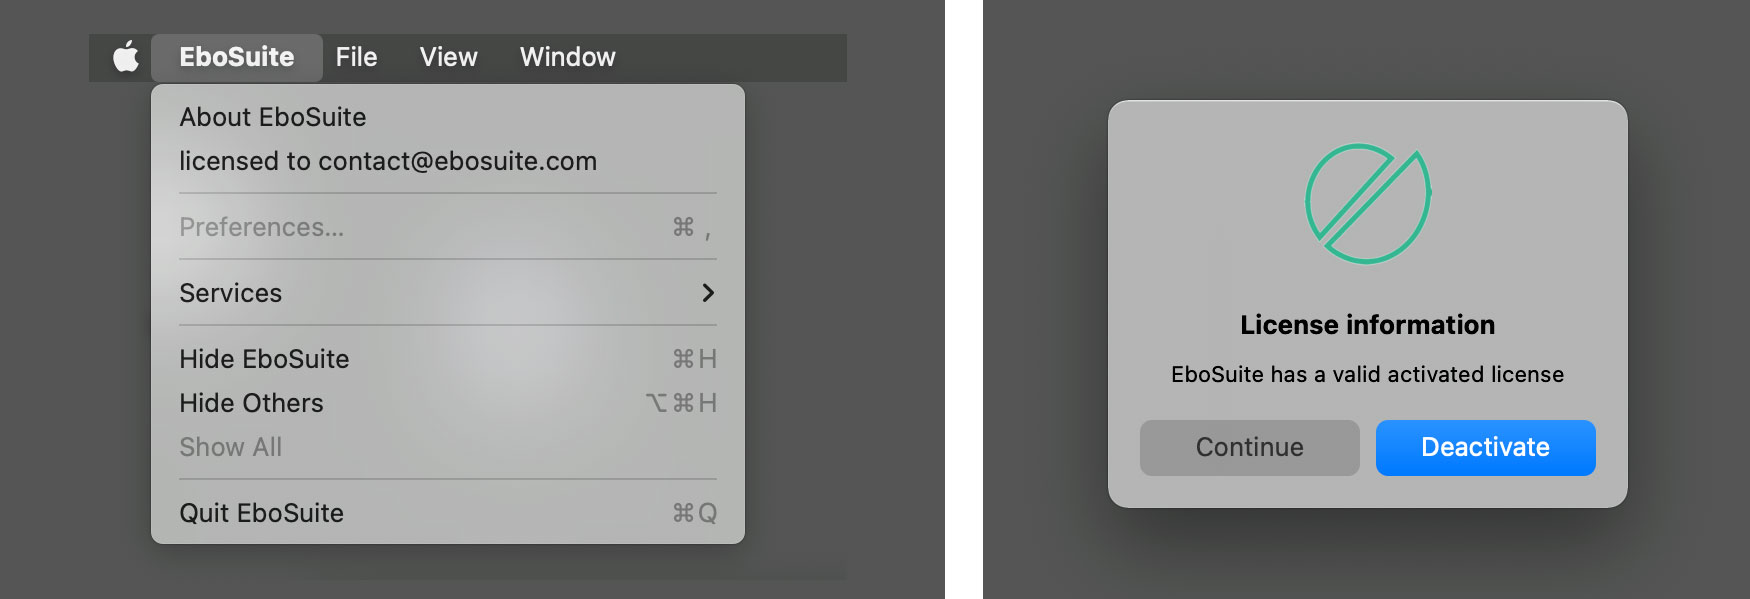
Deactivating a license and moving it to another computer
To deactivate a license and move it to another computer, go to ‘EboSuite’ in the EboSuite main menu and select ‘licensed to [your email address]’. This will open a dialog in which you can deactivate the license, so you can activate another computer.
Settings in Ableton Live
We tried to make the installation and licensing proces as easy as possible. Once EboSuite is installed and registered you can start video sampling, mixing and editing right away. Nevertheless, there are a few settings in Ableton Live that can influence EboSuite’s performance. Therefore, please check the following settings in Ableton Live:
- make sure the User Library selected in the Ableton Live preferences is available. The EboSuite installer will automatically read the preference file of Ableton Live and install EboSuite in the User Library selected there. If this User Library is unavailable (e.g. when it is located on an external drive that is disconnected), you will not be able to launch EboSuite and the plug-ins will show an error message.

- Select the appropriate audio buffer size (Preferences/Audio/Latency/Buffer Size). A smaller buffer size will improve the audio-visual sync and performance of EboSuite, but will have a heavier load on the CPU. We advice you to try different settings and look for a setting that works best with your set-up. A buffer size of 128 or 256 samples will work fine in most cases.